How to Make PowerPoint Portrait: The Complete Guide
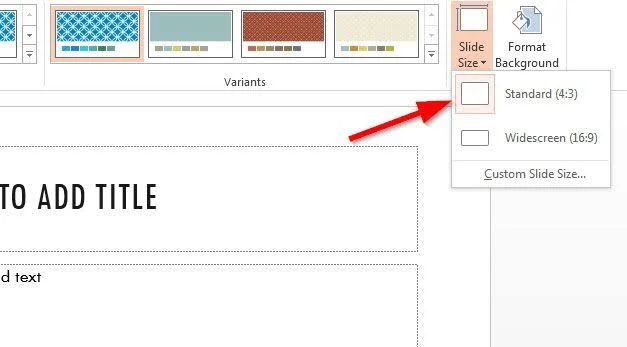
By default, every presentation software package sets your workspace horizontally. Microsoft PowerPoint opens in widescreen 16:9 format because modern computer monitors and conference room projectors share that landscape aspect ratio. However, slide decks are no longer confined to boardrooms. Today, presentations double as event flyers, conference posters, digital menus, e-books, training handouts, and mobile-friendly pitch decks meant to be read on smartphones. If you are wondering how to make powerpoint portrait, the basic mechanical switch takes only four clicks.
The real challenge comes right after the switch: text boxes stretch, wide tables spill over margins, images distort, and PowerPoint asks you a confusing technical question about scaling.
This comprehensive walkthrough covers how to make powerpoint portrait across every operating system, how to safeguard your formatting, how to print vertical slides cleanly, and how to mix vertical and horizontal slides using Microsoft’s official linking workaround.
Quick Answer: How to Make PowerPoint Portrait in 4 Steps
If you need an immediate fix and are working on an empty slide deck, use this rapid sequence:
-
Open your presentation and click on the Design tab on the top ribbon.
-
Look toward the right side of the toolbar and click Slide Size, then select Custom Slide Size (or Page Setup on macOS).
-
Under the Orientation section, find Slides and select the radio button for Portrait.
-
Click OK, then choose Ensure Fit when the scaling prompt appears.
That is the entire base process. Your slides will immediately flip into a vertical orientation. If you have existing content on your slides or need platform-specific instructions, read through the sections below.
How to Make PowerPoint Portrait Across Different Devices
The menu structures differ slightly depending on whether you run Microsoft 365 on a desktop PC, use a Mac, access PowerPoint on a web browser, or edit on a tablet. Here is how to handle each system smoothly.
1. Windows Desktop (Microsoft 365, 2024, 2021, and 2019)
Windows gives you complete control over your dimensions and orientation settings. Follow these steps to configure your slides:
-
Launch your presentation and navigate to the Design tab in the main ribbon.
-
In the Customize section on the far right, click the Slide Size dropdown menu.
-
Select Custom Slide Size to launch the configuration dialog box.
-
Locate the Orientation settings on the right-hand side. Under Slides, change the selection from Landscape to Portrait.
-
Click OK.
-
When prompted to scale your content, click Ensure Fit to keep all text and visuals within the new vertical boundaries.
2. macOS
On Apple computers, the option might appear under a different menu name depending on your Office build:
-
Open PowerPoint for Mac and click the Design tab at the top of your workspace.
-
Click Slide Size and select Page Setup from the dropdown menu. (On older versions of Office for Mac, you can also reach this by clicking File in the menu bar and choosing Page Setup.)
-
In the Page Setup window, look for the Orientation block. Under Slides, click the vertical slide icon representing portrait orientation.
-
Click OK to apply the layout change to your entire deck.
3. PowerPoint for the Web
If you are using PowerPoint via OneDrive or Office online, you can adjust slide proportions without installing desktop software:
-
Open your presentation in your preferred web browser.
-
Click the Design tab in the upper toolbar.
-
Near the right side, click Slide Size, then select Custom Slide Size.
-
In the dialog box, choose Portrait under orientation and click OK.
-
Select your scaling preference to complete the transition.
4. iPad, Tablet, and Mobile Apps
Creating vertical decks on a tablet lets you take advantage of direct touch controls:
-
Open the PowerPoint mobile application and tap the file you want to edit.
-
Tap the ribbon dropdown icon (or tap the Home tab) and switch to the Design tab.
-
Tap Orientation, then tap Portrait.
-
Use pinch, drag, and resize gestures on screen to realign individual elements to fit the taller workspace.
Maximize vs Ensure Fit: Which Scaling Option Should You Pick?
When learning how to make powerpoint portrait with content already on your slides, PowerPoint interrupts you with an unavoidable choice: Maximize or Ensure Fit.
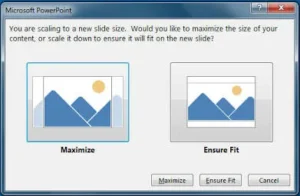
Understanding the mathematical difference between these two choices saves you hours of cleanup time:
When to Pick Ensure Fit (The Recommended Choice)
When you switch from landscape to portrait, your slide workspace becomes narrower. Ensure Fit automatically reduces the proportional dimensions of your images, text frames, shapes, and tables so that every element remains visible on the narrower slide. While it may leave unused vertical space at the top and bottom of your slide, none of your valuable data will disappear outside the viewable margin. For almost every existing deck, Ensure Fit is the safest selection.
When to Pick Maximize
Maximize enlarges your content to fill the full vertical height of the new portrait slide. However, because the slide width just decreased substantially, choosing Maximize pushes the left and right edges of your content past the border of the canvas. This leads to cut-off sentences, sliced diagrams, and displaced objects. Only choose Maximize if your slide consists of a single centered photograph or a minimal icon that you plan to reposition manually.
Standard Dimensions for Portrait Presentations
Orientation simply dictates whether height exceeds width. The actual size of your slide determines whether your presentation displays correctly on mobile devices or prints without blurriness. When you select Custom Slide Size, you can enter specific measurements for your project:
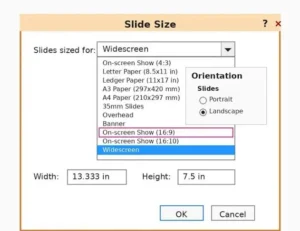
If you are creating decks specifically for mobile distribution via WhatsApp, Slack, or email attachments, using 7.5 by 13.33 inches ensures the exported PDF fills smartphone screens cleanly without awkward letterboxing.
Pre-Emptive Setup: Lock Portrait Mode in the Slide Master
The single most common mistake people make is drafting thirty slides in landscape and then wondering how to make powerpoint portrait without breaking everything. Changing orientations after completing a presentation forces you to adjust thirty individual layouts manually.
The professional solution is to configure your portrait orientation inside the Slide Master before writing a single word:
-
Open a blank presentation in PowerPoint.
-
Go to the View tab on the ribbon and click Slide Master.
-
In the Slide Master tab that opens, click Slide Size and select Custom Slide Size.
-
Set the slide orientation to Portrait and pick your target size (such as Letter or A4).
-
Review the primary layouts on the left thumbnail panel. You can drag title boxes, body text placeholders, and footers so their proportions look balanced in a vertical container.
-
Click Close Master View on the ribbon.
-
Save this file by clicking File > Save As, then change the file type dropdown to PowerPoint Template (*.potx).
Now, every time you or your team need a vertical deck, you can open this clean template with pre-aligned vertical text boxes.
How to Make Just One Slide Portrait in PowerPoint (The Official Workaround)
Can you mix landscape and portrait orientations within the same presentation file? The short answer is no. Microsoft PowerPoint enforces a single global orientation rule across the entire presentation file. If you make one slide portrait, every slide in that file becomes portrait.
However, Microsoft provides an official workaround using interactive action settings that lets you switch between horizontal and vertical slides seamlessly during a live presentation.
The Two-Deck Action Linking Method
-
Create Two Separate Decks: Save your primary horizontal presentation as “Presentation_Landscape.pptx”. Create a second presentation, set its orientation to portrait, design your vertical slides, and save it as “Presentation_Portrait.pptx”.
-
Store in the Same Folder: Move both presentation files into the exact same folder on your computer or cloud directory. This step is essential so the relative file path does not break when you present.
-
Set the Forward Jump Link: Open “Presentation_Landscape.pptx” and navigate to the slide right before your vertical content. Select a shape, text snippet, or navigation button. Go to the Insert tab, locate the Links group, and click Action.
-
Configure the Action Setting: In the Action Settings dialog under the Mouse Click tab, click the radio button for Hyperlink to. Click the dropdown menu, scroll down, and select Other PowerPoint Presentation.
-
Select the Target File: Browse to “Presentation_Portrait.pptx”, select it, and choose the specific vertical slide you want to show. Click OK.
-
Set the Return Link: Open “Presentation_Portrait.pptx”. Go to the final vertical slide, select an icon or button, click Insert > Action > Hyperlink to, select Other PowerPoint Presentation, and choose your original landscape presentation to return seamlessly.
When delivering your slide show, clicking the linked button opens the portrait slide instantly in full-screen presentation mode. When you click the return button, you return directly to your horizontal presentation without the audience ever noticing the file swap.
How to Set Portrait Handouts While Keeping Slides Landscape
Many presenters want to know how to make powerpoint portrait because their manager or client asked for vertical printed handouts. If your audience is viewing your slides on a projector, you should never turn the actual slides vertical just to satisfy the printout.
PowerPoint has completely separate, independent orientation settings for printed notes and handouts:
-
Open your standard landscape slide deck.
-
Click the View tab in the top ribbon.
-
In the Master Views section, click Handout Master (or Notes Master if you want speaker notes included).
-
In the Handout Master tab, click Handout Orientation and change it to Portrait.
-
Ensure that the Slide Orientation toggle inside this master menu remains on Landscape.
-
Click Close Master View.
When you present on screen, your slides will project in standard widescreen landscape. But when you navigate to File > Print and select Print Handouts, PowerPoint prints neat, portrait-oriented pages with your horizontal slides arranged logically down the page.
Preparing Vertical Slides for Print: Avoiding White Borders and Misalignment
A frequent problem with vertical presentations occurs during the printing stage: vertical slides often print with uneven margins or thick white borders along the top and bottom.
To achieve clean, edge-to-edge printing for vertical presentations:
-
Match Paper Standards Exactly: Never design a print-intended vertical deck on the default widescreen aspect ratio turned sideways. That produces a narrow 9:16 column that wastes significant paper width on standard office printers. Always open Custom Slide Size and choose Letter Paper for North American printing or A4 Paper for international printing.
-
Respect Printer Margins: Standard consumer and office printers cannot print to the absolute physical edge of a sheet of paper. They require a mechanical gripper margin of roughly 0.25 inches (6 mm). Keep your text boxes and logos at least 0.35 inches inside the slide boundaries to avoid clipped words.
-
Export as PDF Instead of Printing Direct from PPT: For crisp typography and exact color fidelity, export your portrait presentation as a PDF before sending it to a commercial printer. Go to File > Export > Create PDF/XPS Document. In the export options, select Standard (publishing online and printing) to ensure images retain full 300 DPI print clarity.
Troubleshooting Distorted Elements After Changing Orientation
If you have already applied the steps for how to make powerpoint portrait to an existing deck and your layout looks broken, use these practical fixes to repair your slides:
-
Multi-Column Tables: A four-column table designed for a wide landscape slide will compress into illegible, narrow columns on a vertical canvas. Highlight the table, reduce the body font by two points, and consider splitting the data across two consecutive vertical slides instead of crowding one page.
-
Widescreen 16:9 Video Embeds: When you turn a presentation vertical, embedded horizontal videos shrink to fit the narrower width, creating massive blank gaps above and below the video player. Reposition the video into the top third of the portrait slide, and use the lower two-thirds for key summary bullet points or speaker bios.
-
Distorted Circles and Locked Shapes: If shapes look warped after scaling, right-click the shape and select Format Shape. In the Size and Properties panel, check the box labeled Lock aspect ratio, then re-enter matching values for both height and width.
-
Quick Alignment Shortcuts: Do not align elements by eye. Select all shifted shapes or text boxes on your portrait slide, go to the Shape Format tab, click Align, and choose Align Center followed by Distribute Vertically to produce clean, professional spacing.
Frequently Asked Questions
Can I make just one slide portrait in PowerPoint 365 natively?
No. Microsoft PowerPoint does not support mixing portrait and landscape orientations in a single presentation file. The supported and reliable technique is to create two separate files (one landscape, one portrait) and connect them using action hyperlinks under the Insert menu.
Why does my text overflow after switching to portrait orientation?
Because portrait slides have a narrower horizontal width than landscape slides, text boxes have less room to spread horizontally. When text cannot expand sideways, it wraps onto additional lines, pushing body copy downward and out of view. You can resolve this quickly by lowering your font sizes slightly or widening text containers in the Slide Master.
How do I revert my portrait presentation back to landscape?
To return to horizontal slides, go to the Design tab, select Slide Size > Custom Slide Size, choose Landscape under the Slides orientation setting, and click OK. Select Ensure Fit to pull your content back into the widescreen aspect ratio.
Can I save a vertical PowerPoint slide as a high-resolution image?
Yes. Go to File > Save As, choose your save destination, and select PNG Portable Network Graphics Format or JPEG File Interchange Format from the file type menu. PowerPoint will ask whether you want to export all slides or just the current slide. Select your preference to create vertical images ready for mobile sharing.








Post Comment