How to Speed Up MacBook: 12 Proven Fixes for Performance
Few things disrupt a productive workday faster than a sluggish laptop. When apps pause before opening, the cursor turns into a spinning beachball, or typing lags behind your keystrokes, your hardware is telling you that system resources are stretched thin. If you want to know how to speed up macbook performance without rushing out to buy a new machine, you need a systematic troubleshooting approach rather than random guesswork.
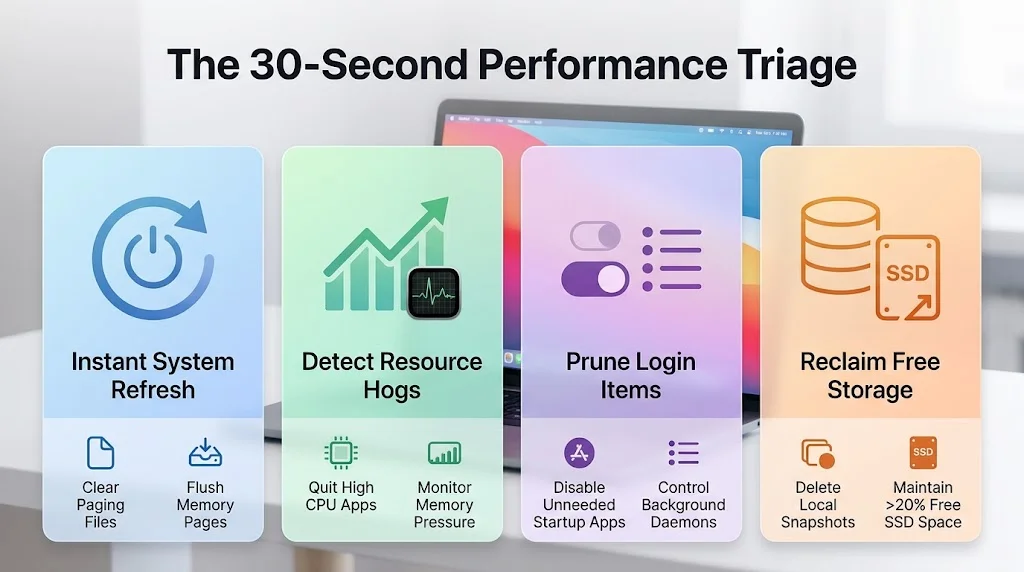
Before adjusting deep system preferences or purchasing third-party cleanup utilities, run through this quick triage to recover immediate responsiveness.
-
Restart your machine via the Apple menu to flush active memory pages and temporary caches.
-
Open Activity Monitor and close any non-essential application consuming more than 15 percent of your CPU.
-
Open System Settings and turn off unneeded startup apps inside the Login Items menu.
-
Check your internal drive to verify that you have at least 15 to 20 percent free storage space for virtual memory swap files.
-
Install pending macOS updates to patch known software memory leaks.
Quick Diagnostics: How to speed up macbook?
Understanding why your laptop is struggling prevents you from wasting time on fixes that yield no results. Modern macOS is remarkably efficient at managing resources, but hardware bottlenecks still occur when software demands exceed available CPU, unified memory, or thermal limits.

Reading Activity Monitor: CPU Spikes vs. Memory Pressure
When diagnosing performance hiccups, your first stop should always be Activity Monitor, which you can launch instantly using Command plus Space. Many users make the mistake of sorting solely by percentage of CPU. While a misbehaving application or crashed background process can max out processor cores, memory management is just as critical.
Click over to the Memory tab and look at the Memory Pressure graph at the bottom of the window. Apple designed this graph to communicate system strain far better than simple gigabyte numbers.If you want to know how to speed up macbook performance without rushing out to buy a new machine, you need a systematic troubleshooting approach rather than random guesswork.
-
Green: Your Mac is utilizing its RAM efficiently and has plenty of breathing room.
-
Yellow: Memory allocation is tight. The operating system is beginning to compress memory pages and shuffle data to your SSD.
-
Red: Your physical memory is completely exhausted. Critical tasks are stalled, which triggers extreme system lag.
If you see a red graph, review the top entries on the list and quit memory-hungry applications you are not actively using.
Unified Memory, SSD Swap File Exhaustion, and Storage Thresholds
On modern Apple Silicon architectures, memory is unified across the central processor and graphics cores. When that shared pool runs out, macOS borrows space from your internal solid-state drive, creating temporary swap memory.
If your SSD is nearly full, the system cannot generate these swap files. The result is an immediate performance cliff. To prevent this, never let your startup drive drop below 15 to 20 percent free capacity. A drive with only a few gigabytes remaining will struggle to execute basic background calculations.
Thermal Throttling, Fan Noise, and Degraded Battery States
A slow Mac is not always a software issue. If your internal fans are running at top speed, your processor may be executing thermal throttling. When internal sensors detect high temperatures, the operating system intentionally reduces processor clock speeds to protect internal components from heat damage.
Similarly, an aging battery with a degraded health status can trigger aggressive power throttling in macOS, forcing your machine to run below its normal baseline speed to prevent unexpected shutdowns.
Fast Fixes to Boost Performance in Minutes
You can resolve many common slowdowns in just a few minutes using built-in macOS tools.
Rebooting to Purge Temporary Paging Files
It sounds elementary, but a standard reboot solves an extraordinary number of performance issues. how to speed up macbook? When a MacBook stays powered on for weeks at a time, sleep-wake cycles accumulate background logs, orphaned daemon tasks, and fragmented memory swap allocations. Restarting closes every operational thread, flushes temporary system scratchpads, and lets the operating system re-index running files from a fresh baseline.
Managing Startup Programs and Pruning Modern Login Items
If your computer takes several minutes to become usable after booting up, too many applications are likely fighting for priority during startup.
-
Click the Apple menu and select System Settings.
-
Navigate to General and then select Login Items and Extensions.
-
Review the Open at Login list. Highlight any application that does not need to launch automatically and click the minus sign.
-
Scroll down to the Allow in Background section. Toggle off permissions for software updaters and utilities that you rarely use.
Pruning this list cuts your boot duration and prevents quiet background resource consumption throughout the day.
Taming Browser Resource Hogging in Chrome and Safari
Web browsers are often the single largest consumer of working memory on a computer. If you regularly work with dozens of open tabs across multiple windows, browser processes will rapidly consume both CPU cycles and memory.
In Google Chrome, open the built-in Task Manager by clicking the three-dot menu, choosing More Tools, and selecting Task Manager. Identify heavy web pages, scripts, or extensions that are using excessive memory and close them. If you prefer Safari, open its Settings menu, visit the Advanced tab, and enable the Develop menu to monitor Safari Web Content processes. Removing unused extensions in both browsers is one of the easiest ways to streamline your daily workflow.
Clearing Desktop Clutter and Consolidating File Previews
A cluttered desktop looks messy, but it also carries a real performance penalty. In the macOS architecture, every individual icon, screenshot, and file sitting on your desktop is rendered as an active visual window with its own thumbnail preview. Having hundreds of loose files scattered across your desktop forces your window server to constantly consume resources just to maintain those previews.
Right-click any empty space on your desktop and select Use Stacks. This automatically groups your files into neat categories, reducing graphical draw calls and freeing up memory for your active apps.
Deep Disk and Storage Optimization
When basic adjustments do not resolve the issue, a full storage audit is the next logical step.
How to Clear System Data and Hidden Caches Safely
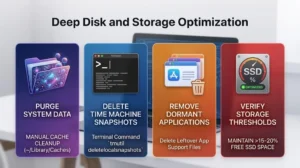
When checking your storage breakdown under System Settings, you may notice a gray bar labeled System Data that consumes dozens, or even hundreds, of gigabytes. This bucket contains cached data, application logs, runtimes, and temporary staging files.
To clear user cache files manually without damaging your system:
-
Open Finder, click the Go menu in your top menu bar, and select Go to Folder.
-
Type
~/Library/Cachesand press Return. -
Review the folders inside, which correspond to your installed applications.
-
Select and delete the contents of folders belonging to apps you no longer use, then empty your Trash.
Never delete the folders themselves, only the cached contents within them. Avoid modifying system-level caches located in the root /Library/ directory, as the operating system requires those for core stability.
Deleting Local Time Machine Snapshots via Terminal
If you use Time Machine to back up your computer, macOS periodically saves local snapshots directly onto your internal drive when your external backup disk is disconnected. While the operating system is supposed to purge these snapshots automatically when space runs low, they frequently get stuck, bloating your System Data category.
You can inspect and remove these stubborn backups using Terminal:
-
Open Terminal via Spotlight.
-
Enter the command
tmutil listlocalsnapshots /to display stored local backups. -
If snapshots appear, delete them by typing
sudo tmutil deletelocalsnapshots [date-string], replacing the bracketed portion with the snapshot date identifier shown on your screen. -
Enter your admin password when prompted to complete the cleanup.
Removing Dormant Applications and Leftover Application Support Files
Dragging an unwanted application to the Trash does not always remove all of its associated data. Small configuration files, preference panes, and cached helper scripts often remain tucked away in hidden system folders.
Open Finder, click Go to Folder, and inspect ~/Library/Application Support. Look for folders bearing the names of software you have long since uninstalled. Deleting these leftover directories recovers storage space and stops orphaned daemons from pinging non-existent servers in the background.
Background Services, Indexing, and System Hygiene
Persistent slowness is frequently caused by hidden processes working silently behind the scenes.
Hunting Hidden LaunchDaemons and Background Extensions
When you install advanced utilities, VPNs, or system monitoring software, they often install launch agents that start automatically at the root level, bypassing standard user login settings.
To inspect these hidden tasks:
-
In Finder, navigate to
/Library/LaunchAgentsand/Library/LaunchDaemons. -
Review the plist files stored inside.
-
If you spot configuration files belonging to software you have completely removed, move them to the Trash.
Be cautious in these directories. Only remove plist files associated with third-party software you recognize and no longer need. Leave all Apple-labeled system services alone.
Handling Slowness After a macOS Update (Spotlight and Photo Indexing)
If your laptop feels painfully slow immediately following a major macOS upgrade, your hardware may not be at fault. Major updates trigger full system re-indexing routines that run quietly in the background.
Open Activity Monitor and check for processes named mds, mds_stores, or photoanalysisd. The first two belong to Spotlight, which re-indexes your entire drive so searches remain instantaneous. The third analyzes your Photos library using local machine learning to categorize faces, objects, and scenes. Both processes consume heavy CPU resources. The best solution here is simple patience: keep your computer plugged into power, leave it awake overnight, and let the initial indexing cycles finish.
Adjusting Battery Power Modes and Updating macOS
How to speed up macbook? Modern MacBooks offer adjustable performance settings that dictate how internal components consume electricity.
-
Open System Settings and click Battery.
-
Review your selected Energy Mode options.
-
If your machine is set to Low Power Mode, it will intentionally limit processor performance to conserve battery life. Switch this to Automatic for balanced operation.
-
How to speed up macbook? If you use a 16-inch MacBook Pro with an M-series Max chip and tackle intensive video rendering, you can select High Power Mode to let internal cooling fans spin up earlier, preventing thermal drops during heavy workloads.
Always keep your operating system updated via System Settings, General, and Software Update. Apple consistently rolls out point releases that patch underlying memory leaks and improve native hardware efficiency.
Advanced Hardware Diagnostics: Apple Silicon vs. Legacy Intel
Depending on the processor inside your machine, your troubleshooting path will diverge when deeper maintenance is needed.
Diagnostic Steps for M-Series Chips
Modern Apple Silicon computers manage hardware states automatically, which means old manual workarounds are obsolete. You cannot manually reset the SMC or PRAM on an M1, M2, M3, or M4 machine, as those functions are handled internally by system firmware during every standard boot cycle.
If you suspect a low-level hardware issue on an Apple Silicon device, run Apple Diagnostics:
-
Shut down your laptop completely.
-
Press and hold the power button until you see the Loading Startup Options screen.
-
Press and hold Command plus D on your keyboard.
-
Let the diagnostic sequence run. It will check your memory, logic board, and power circuits, returning reference codes if an issue is detected.
When Legacy NVRAM and SMC Resets Still Apply
If you are using an older Intel-based model, hardware controllers occasionally require a manual reset to restore proper fan speeds, power distribution, and video output.
-
SMC Reset: Shut down the computer, plug in the MagSafe power adapter, and press Shift plus Control plus Option on the left side of the keyboard along with the power button. Hold all four keys for ten seconds, release them simultaneously, and turn the laptop back on.
-
NVRAM/PRAM Reset: Shut down your machine, press the power button, and immediately hold Command plus Option plus P plus R. Keep holding all four keys for roughly twenty seconds until you hear a second startup chime or see the Apple logo appear and disappear twice.
Performing these resets clears corrupted hardware configurations, which often resolves erratic fan noise, sluggish display responses, and battery charging anomalies on older Intel architectures.
FAQs
Do Mac cleaner apps actually help improve performance?
Automated cleaning apps provide convenience by gathering file deletion steps into a single interface, but they rarely do anything you cannot accomplish yourself for free. In fact, aggressive cleaners that run continuously in the menu bar often consume the exact memory and processor cycles you are trying to save.
How much free SSD storage space does my computer need?
Aim to maintain at least 15 to 20 percent of your total solid-state drive capacity as free space. This cushion ensures that macOS has sufficient room for dynamic swap files, sleep images, and routine file defragmentation.
Learning how to speed up macbook hardware does not require specialized technical expertise. By understanding memory pressure, keeping your internal drive clear of unnecessary clutter, and addressing runaway background processes, you can keep your laptop running smoothly and efficiently for years to come. This article helps you learn how to speed up macbook?









Post Comment